##Update the system:
##Install the dependencies:
##Setup MySQL Securely:
##Enable mcrypt in the PHP configuration files:
##Install composer:
##This will allow us to run composer without specifying the path:
##Create the directory that you want to install Paperwork at and CD into it:
##Download Paperwork using git:
#Enter the front end directory:
##Run "composer install" and/or "composer update". To install all needed dependencies
##Connect to MySQL
##Configure Database - replace green text with your info
##Create db file and add your info to it - replace green text with your info
##After completing these steps, run the migration jobs, that fill the database:
##Backup nginx file and make new one
##Add the example nginx config - Edit to your preferance or go with this one.
##Install npm:
##Install gulp and bower:
##Cleanup and permissions
##Restart services
DisclaimerThis project is currently under development, so use it on your own risk!
Please support the project and it's creator at https://github.com/twostairs/paperwork Source and project wiki: https://github.com/twostairs/paperwork/wiki
0 Comments
Installation.... ? Getting to watch Netflix on Linux used to be rather difficult either requiring suboptimal third-party software or difficult workarounds just to be able to play a video!
These days are now over as Google Chrome has been able to solve a DRM issue with Netflix, so you may now view Netflix natively in the newest version of Google Chrome. So to view Netflix on Linux do the following:
Thats it!
Installation Simply copy and paste the following lines of code into a terminal. It will prompt you for a password once for administrative privileges. Note: Lines starting with ## are comments and do not need to be copy/pasted Code Editor
Source: Spotify
Note: Due to compatability issues with the new versions of the Ubuntu server (16.04 LTS) we'll be using 14.04 for this tutorial, it should still be applicable to 16.04 though. Making a bootable USB-StickFirst thing we'll need to do is find and download our .ISO or "image" file that contains the system. For convience's sake I've added links to the download mirrors below, but I'd highly recommend checking out Ubuntu's website if you want more information or support the project. Secondly we need a tool to prepare and create our bootable USB stick. In this how-to we'll be using Rufus ISO. (Again, download link below.). Open up Rufus ISO and select the CD-Rom 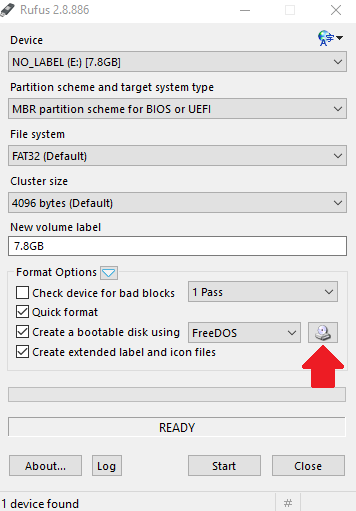 Navigate to where you saved the ISO, select it and click "Open".  Click "Start" to begin creating the bootable USB Stick. 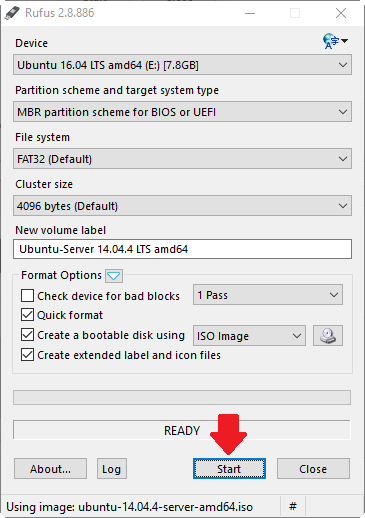 Rufus will ask you which mode you want to write the Image. Use "ISO Image mode" unless you've had problems installing ubuntu in the past. 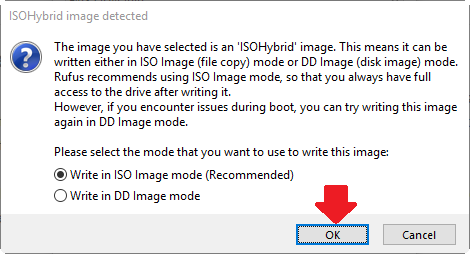 Rufus WILL wipe all the data on the USB before making it into a bootable USB stick. Backup anything you might have on it before continuing. Press "Ok" to continue.  Booting into the system After Rufus has finished preparing the USB stick (Green bar is filled and says "Ready") plug the USB stick into the machine you wish to install Ubuntu and open the boot manager during start. (This is usually done by pressing "F8", "F11" or "Delete" ) Select your device from the boot manager (Usually USB Something) and click enter to boot the USB. Installing the systemSelect the language for the INSTALLER and press enter to continue 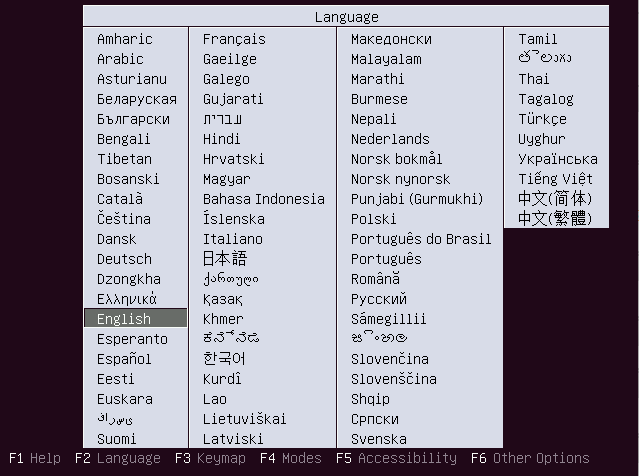 Select "Install Ubuntu Server" and press enter to continue 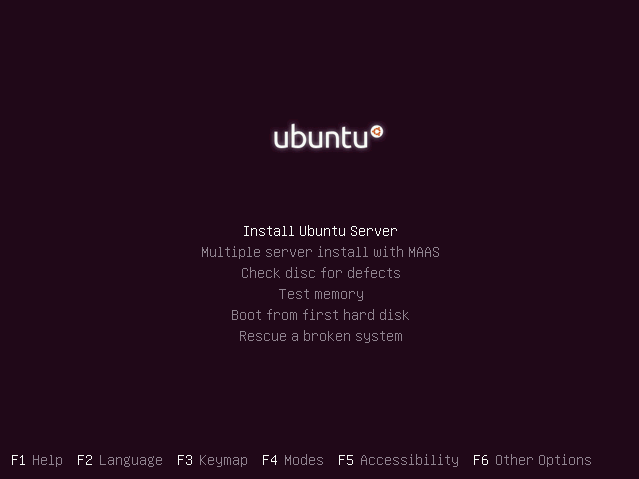 Select language for the INSTALLATION and press enter to continue 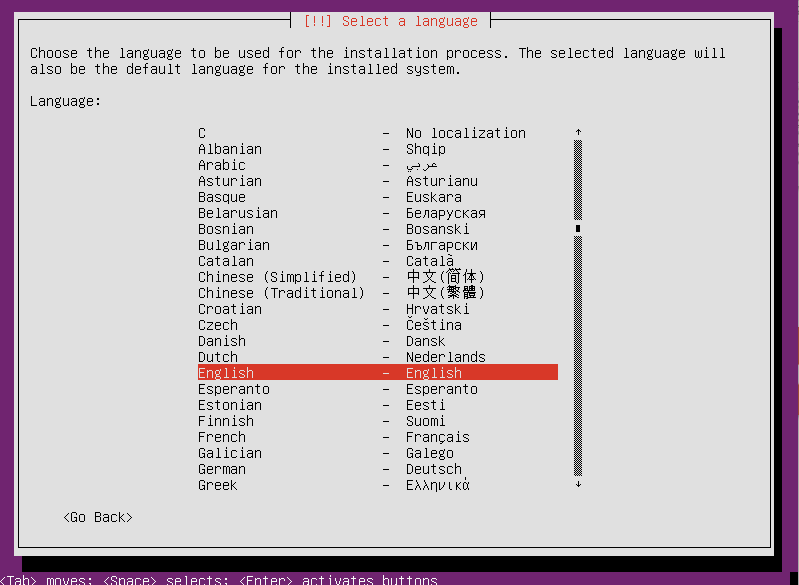 Select your location and press enter to continue. 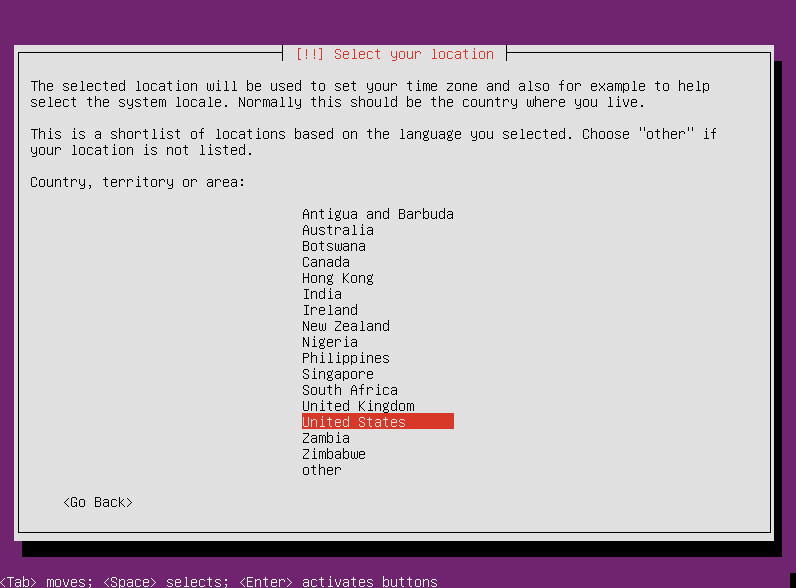 Select your timezone and press enter to continue. 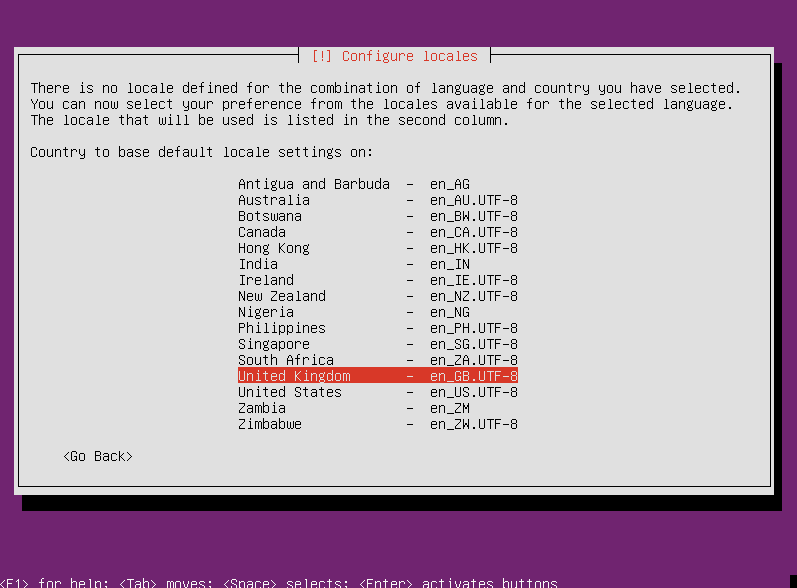 Either select "Yes" so that the installer may try to automatically try to determine your keyboard layout or press "No" to select it yourself. We'll be selecting "No" in this example so that we may select our layout ourselves. 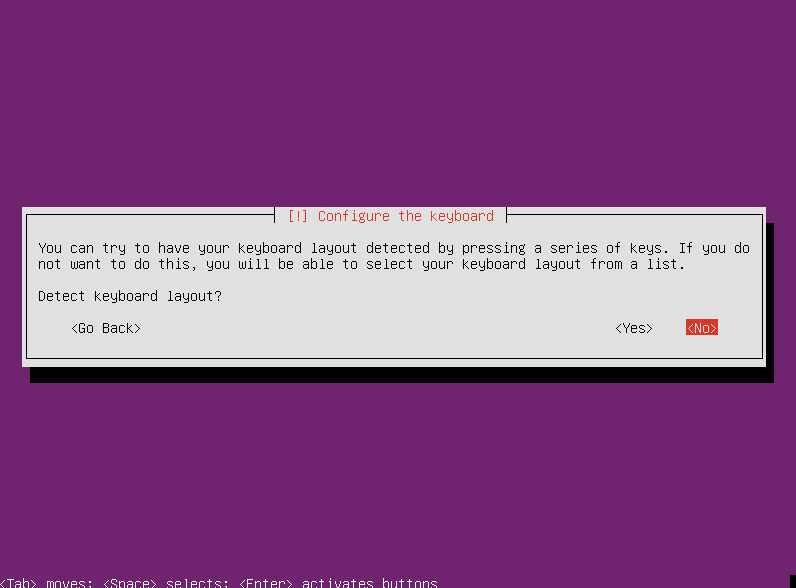 Find and select the country of origin for the keyboard you're using and press enter to continue. 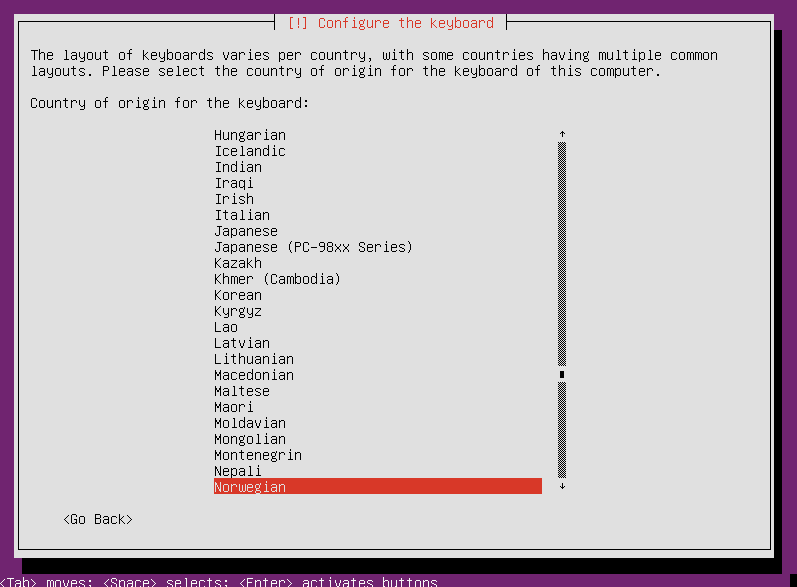 Select your layout and press enter to continue. 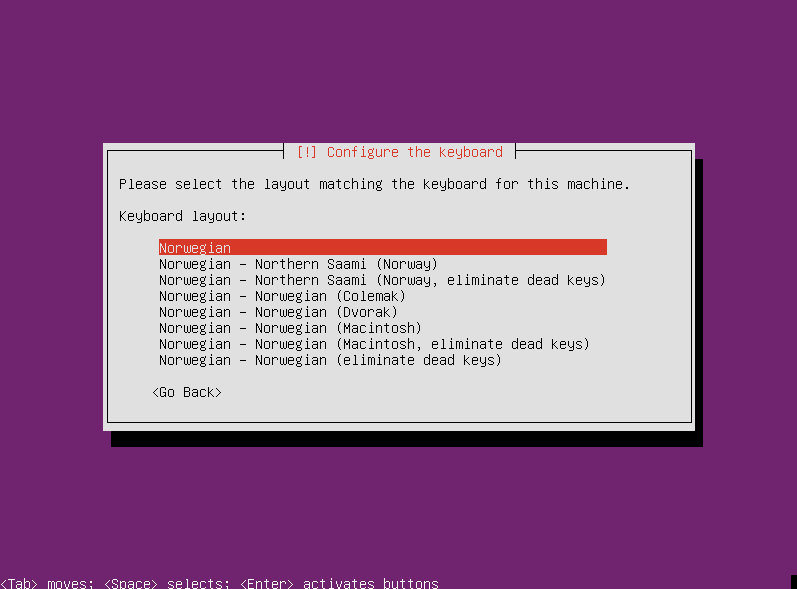 Enter a name for your server, tab to select "Continue" and press enter to continue. 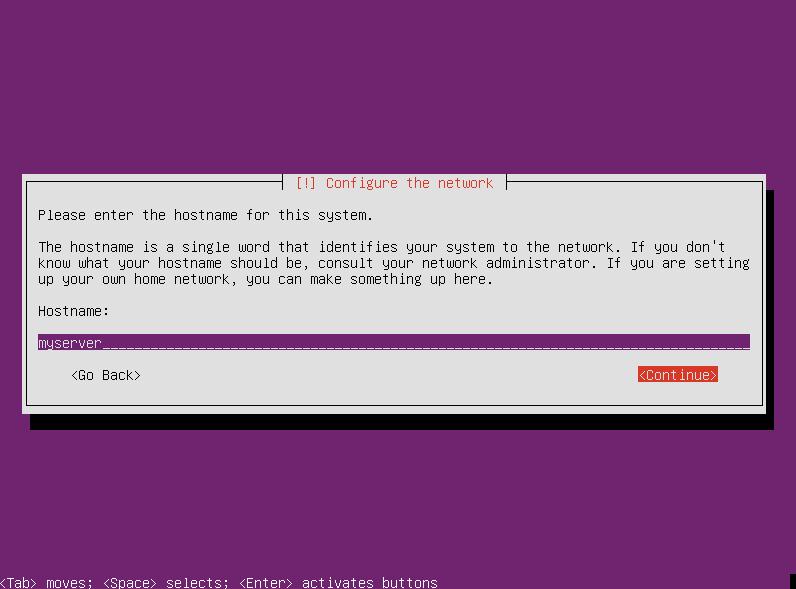 Enter a name for your account, tab to select "Continue" and press enter to continue. (Note: This is NOT the username, but a normal name to be tied to the account. f.ex. John Smith is the name for the user johnsmith) 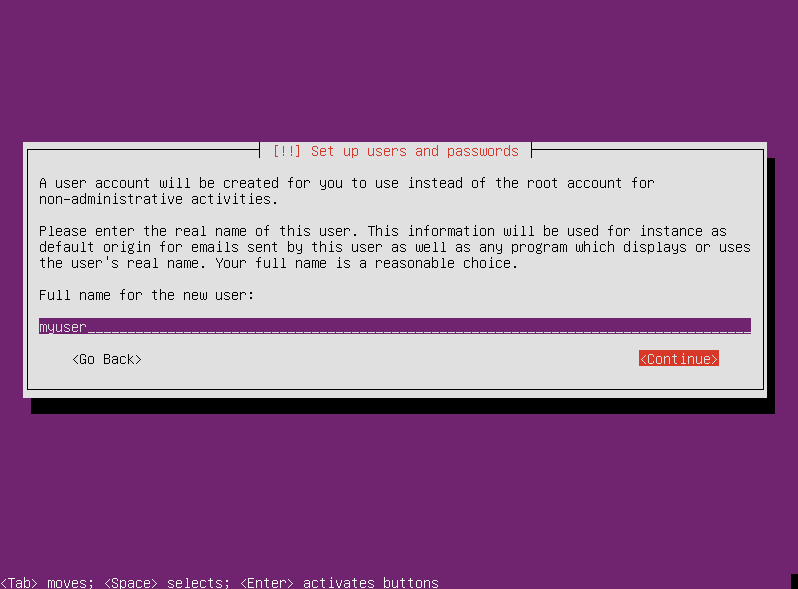 Enter a username for your account, tab to select "Continue" and press enter to continue. 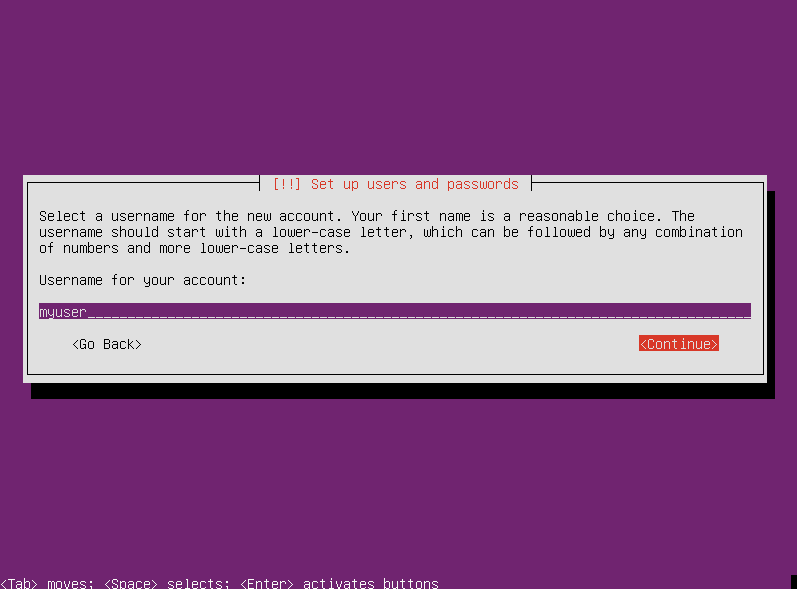 Enter a password for your account, tab to select "Continue" and press enter to continue. 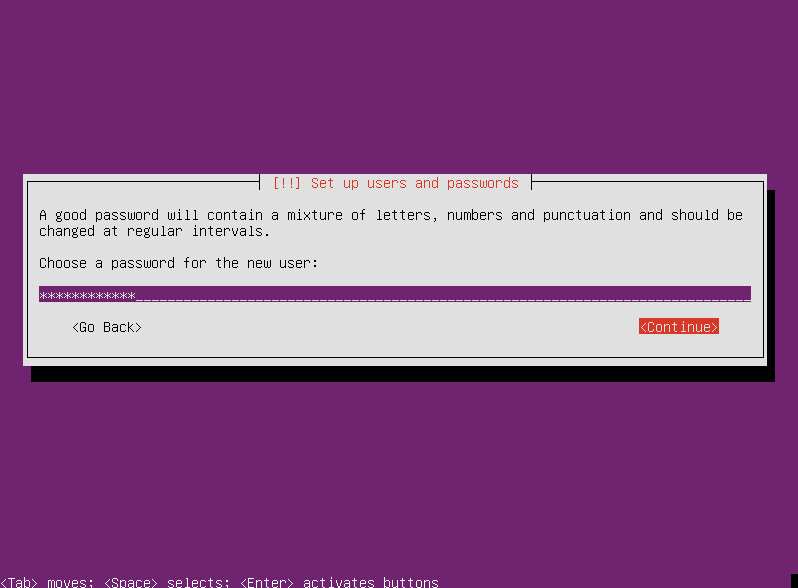 Re-enter a password for your account, tab to select "Continue" and press enter to continue. 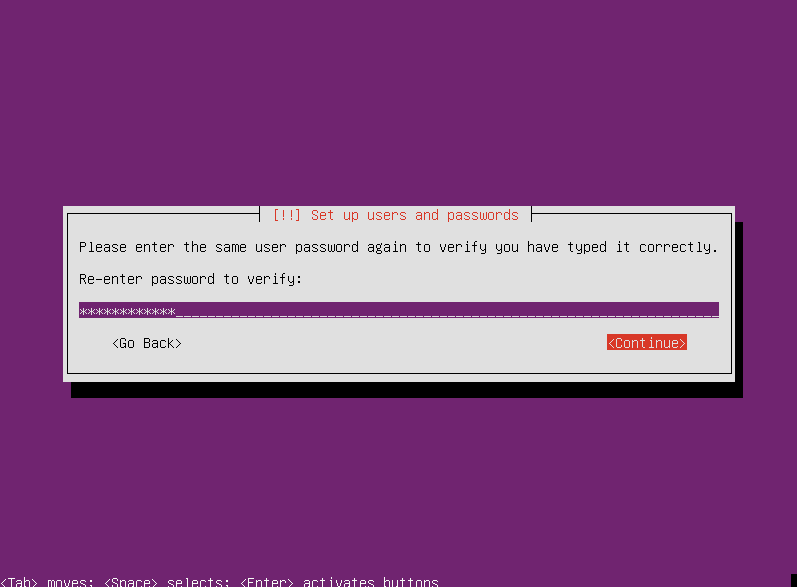 In this tutorial we will not be encrypting the distribution. If you would like to do so I recommend doing it while partitioning and encrypt the entire drive. Tab to select "No" and press enter to continue. 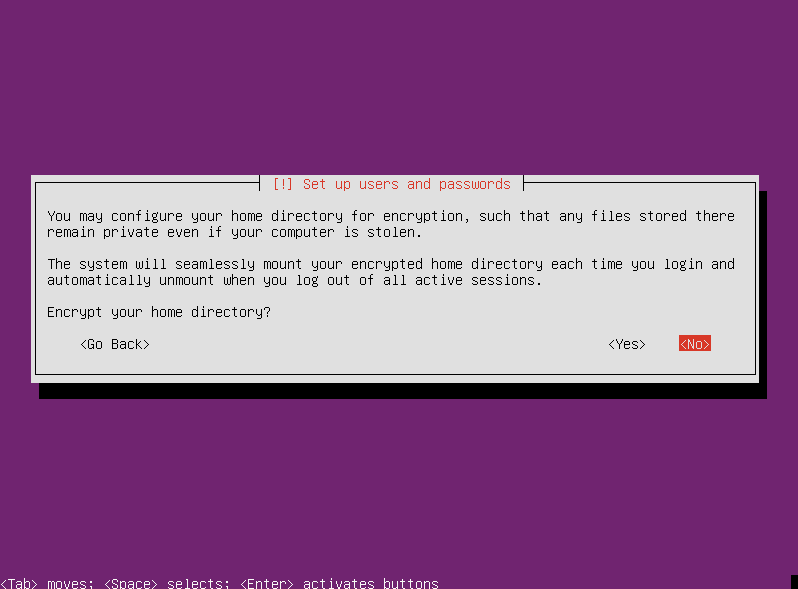 Based on the settings we set earlier the server will try to determine our timezone. If correct tab to select "Yes" and press enter to contiue, otherwise tab to select "No" and select your timezone first. 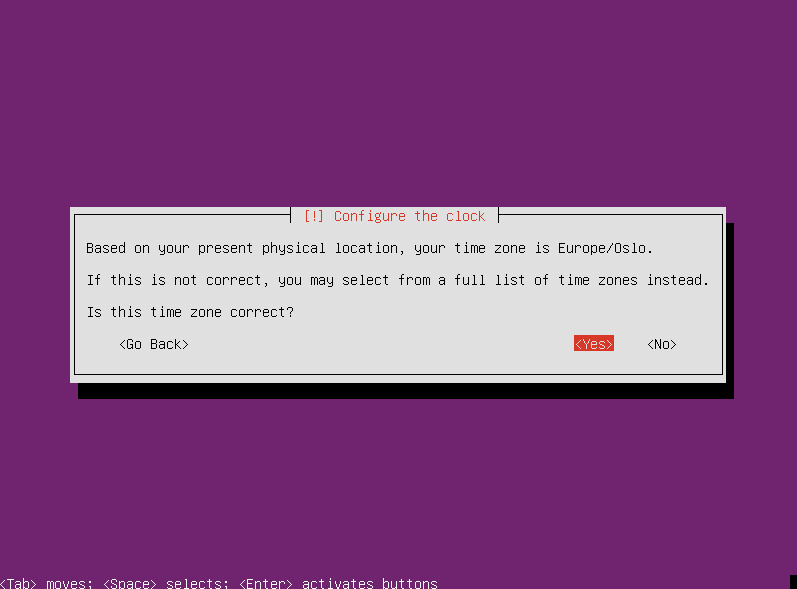 For partitioning we'll let Ubuntu guide us. Tab to select "Guided - use entire disk and set up LVM". The "LVM" part will make it easier to resize and edit our partitions if needed at a later time. Press enter to contiue. 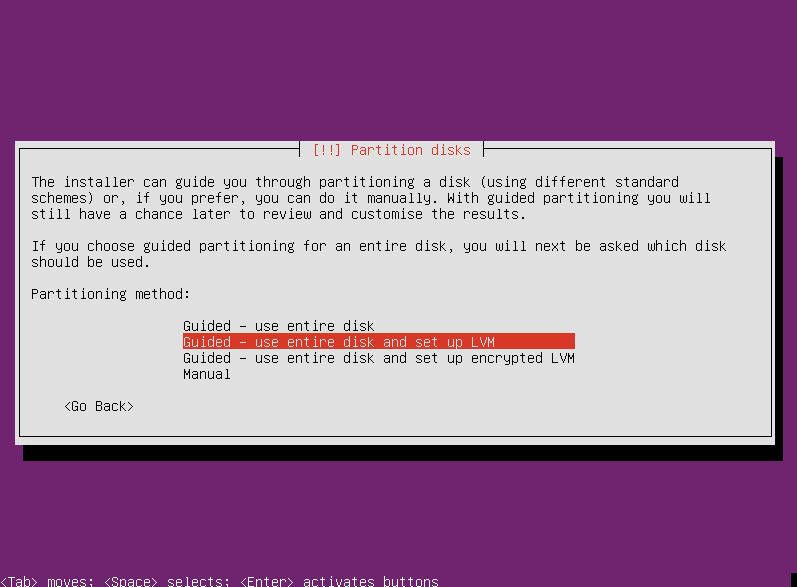 Select the disk you wish to partition. (NOTE: THIS WILL WIPE ALL DATA ON THE SELECT DISK.) Press enter to continue 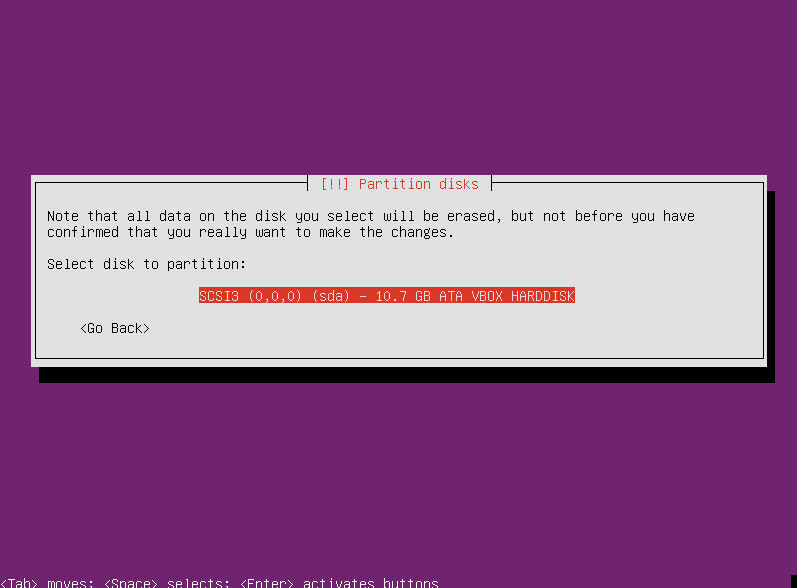 Again, all data on the select disk will be WIPED so make sure that you've selected the right one and that there is nothing there you need. Tab to select "Yes" and press enter to continue. 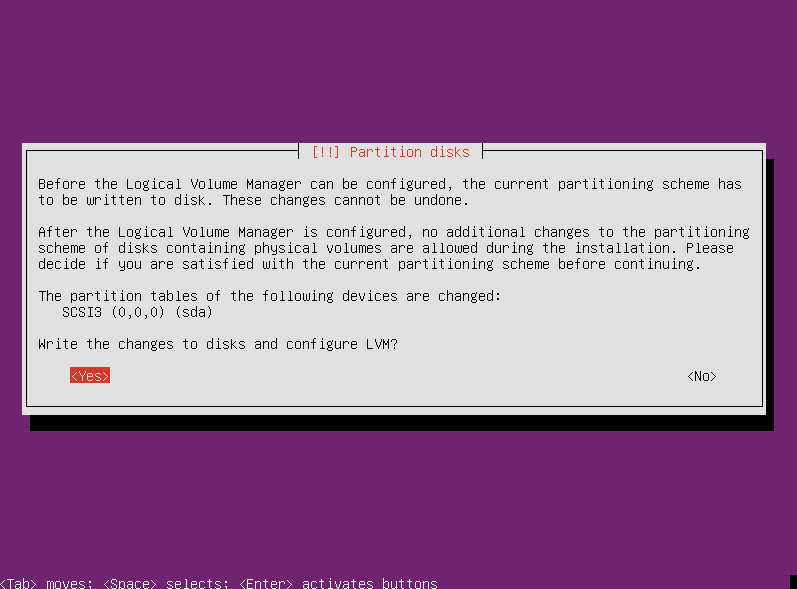 The installer defaults to the size of the entire disk. Tab to select "Continue" and press enter to continue. 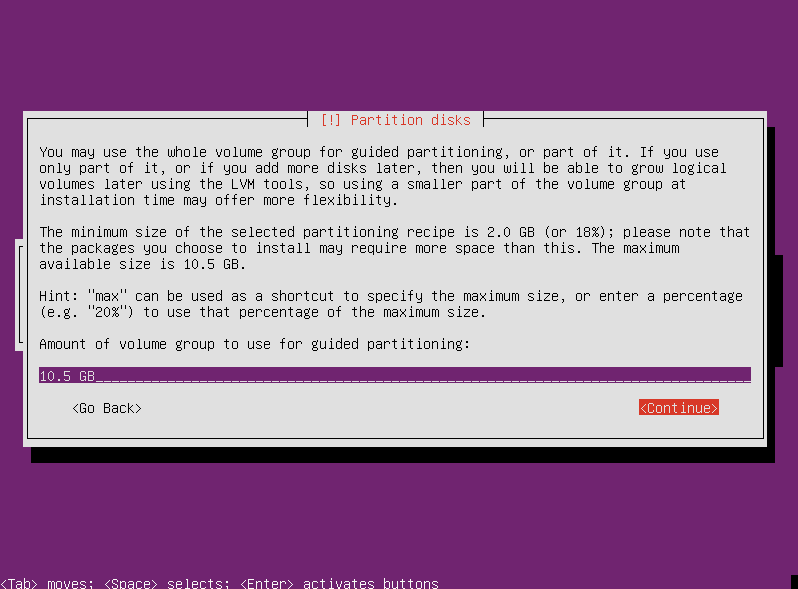 This is a preview of all the changes and a final warning screen. Confirm that everything is correct, tab to select "Yes" and press enter to continue. 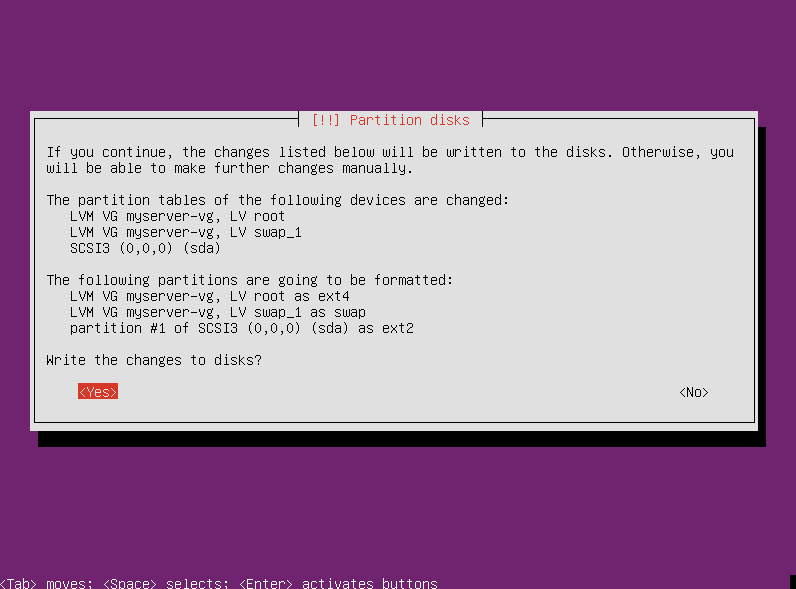 We will not be using or setting up any proxies. Tab to select "Continue" and press enter to continue 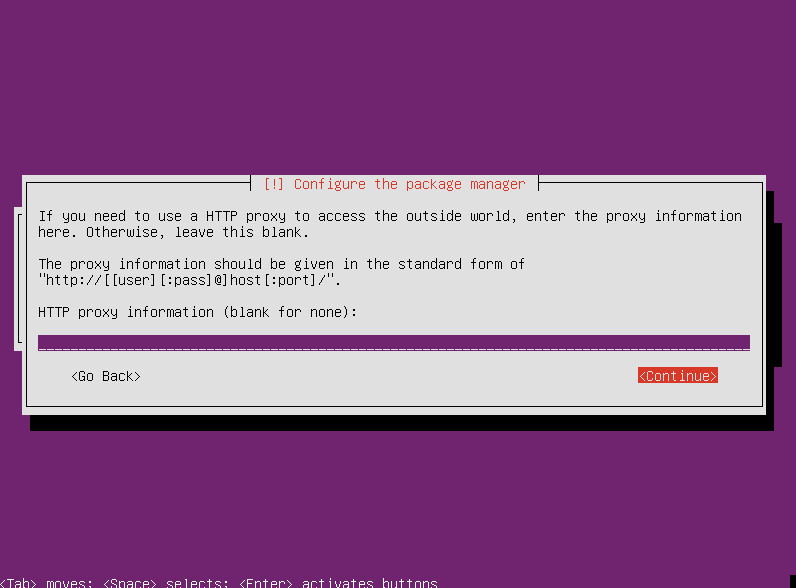 Unless you have a specific requirement for your server that demands otherwise, use arrow keys to select "Install Security updates automatically" and press enter to continue. 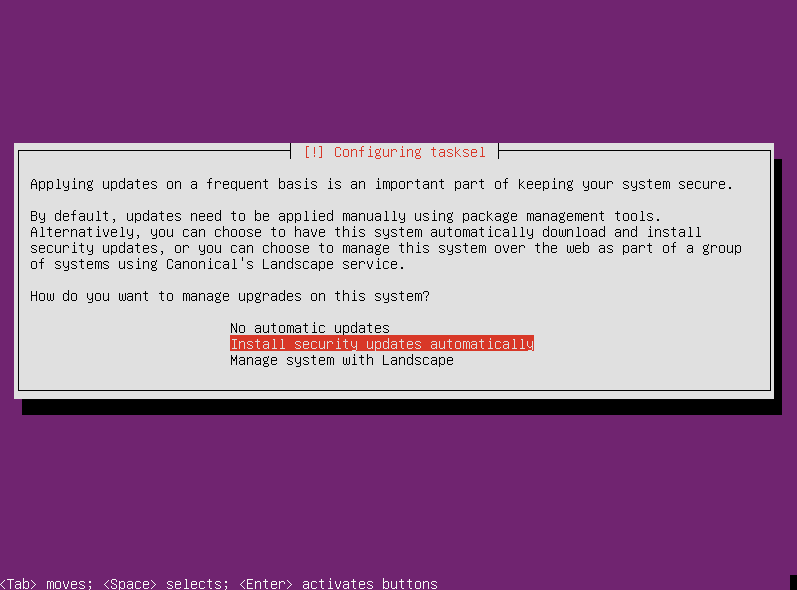 For optional software we'll select "OpenSSH" and "Samba File Server". Use arrowkeys to navigate and spacebar to "mark" the boxes beside these two. When both boxes are marked use the arrow keys to navigate to "Continue" and press enter to continue. 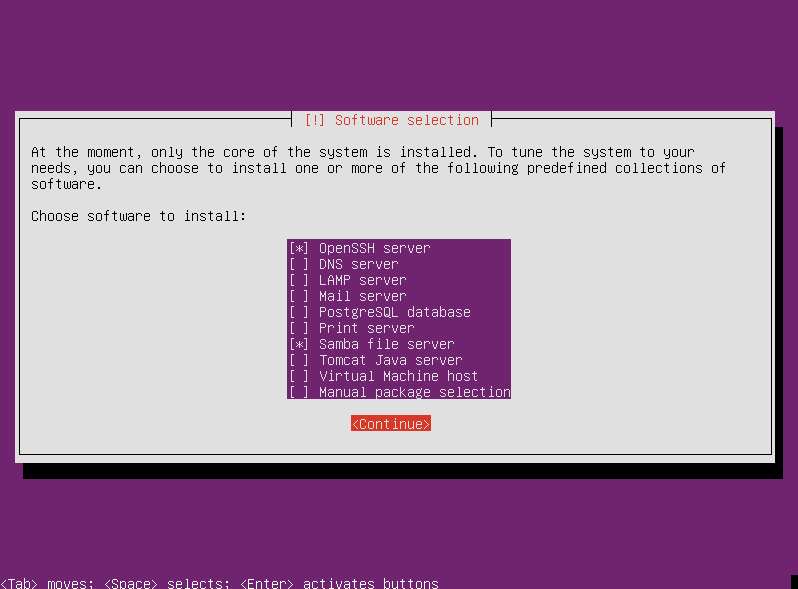 To be able to boot into the system we also need a bootloader. By default Ubuntu uses GRUB. Tab to select "Yes" and press enter to continue and install GRUB. 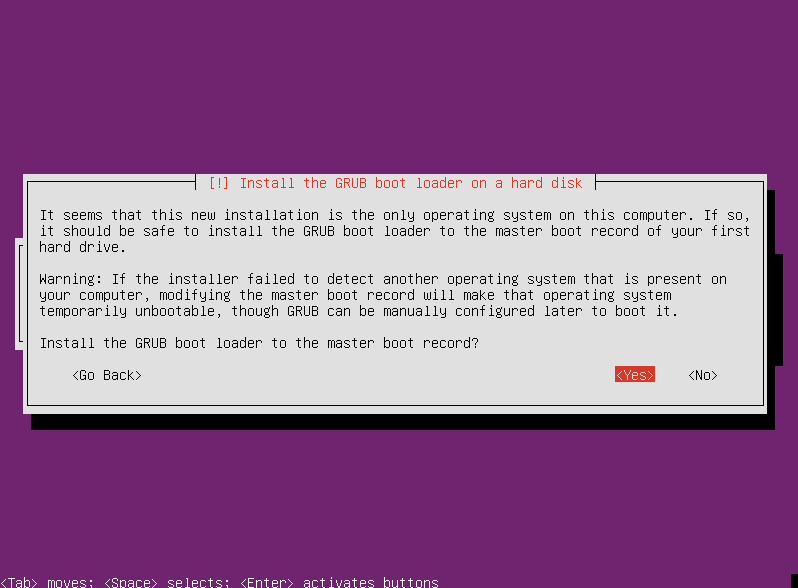 Aaaand the installation is complete! Remove your USB Drive and press "Enter" to continue and reboot into your server! ExtraTo access and remotely configure/work on the server I use "Putty".
Putty is a free tool that allows me to connect remotely via SSH to a terminal at the server. You can download putty here: (CLICK ME, I'M A LINK)
DownloadFirst we need to find and acquire the latest version of Teamspeak. Navigate to the Teamspeak website
Note: the version numbers may change in the future and you will then have to update the version numbers in the commands. Secondly all lines start that with ## is to meant as a comment and you do not need to copy/paste these! InstallationOpen the terminal and navigate to your Downloads folder Code Editor
Change the files permissions so that we may run it Run the file Scroll/read through the terms of service either by using arrow keys, enter or space bar. Enter "q" once you've finished Enter "y" to accept and press the enter key to continue. Configuration First we need to move the Teamspeak client folder to a more appropriate place. By default Teamspeak 3 does not come with a launcher icon and can therefore only be run through the terminal. Code Editor
To make Teamspeak 3 runnable from the Launcher / Desktop we need to make a .desktop file for it. First download an icon / image for the file Code Editor
Then create the desktop file and make it executable Open the file Add the necessary contents to make the file operational
Download First we need to find and acquire the latest version of Teamspeak. Navigate to the Teamspeak website
Note: the version numbers may change in the future and you will then have to update the version numbers in the commands. Secondly all lines start that with ## is to meant as a comment and you do not need to copy/paste these! Installation Open the terminal and navigate to your Downloads folder Download the package Extract the package contents Move the files to an appropriate location Code Editor
Edit permissions Clean up the files we no longer need Configuration (basic) We'll now configure the server to function as a service and to start at system boot by running the following commands. Starting server / connecting to server When starting the ts3server for the first time it's REALLY important that you copy and/or write down the information it provides in the terminal. To connect to the server you enter your Public IP with (any) user name and no password. The first time you log in you will need to provide the key written down earlier to gain administrative privileges. The key is only valid for ONE use. To create additional keys click "Permissions" then "Privlegde keys" and "create". Write down or copy the keys you're creating and store them somewhere safe. Extra If you're running your server behind a firewall the following ports needs to be opened. Firewall rules For voice: 9987/udp For file transfer: 30033/udp TroubleshootCheck that the server is running (by using the command above)
Check that your firewall rules are O.K. Check that your modems NAT (port forwarding) is O.K.
Aquiring the nessesary software Before we can actually transfer anything to our SD card we need to make sure it's clean and propperly formatted. Luckily for us the SD Association have made a free tool called "SD Formatter" that does this via a click of a button for us. Secondly we also need something to propperly install the Image to our Raspberry PI. For that we'll be using a community made tool by tweaking4all.com. Another free tool that "bakes" our Raspberry PI with the image of choice. Download linkes for both are set below. Preparing our SD Card
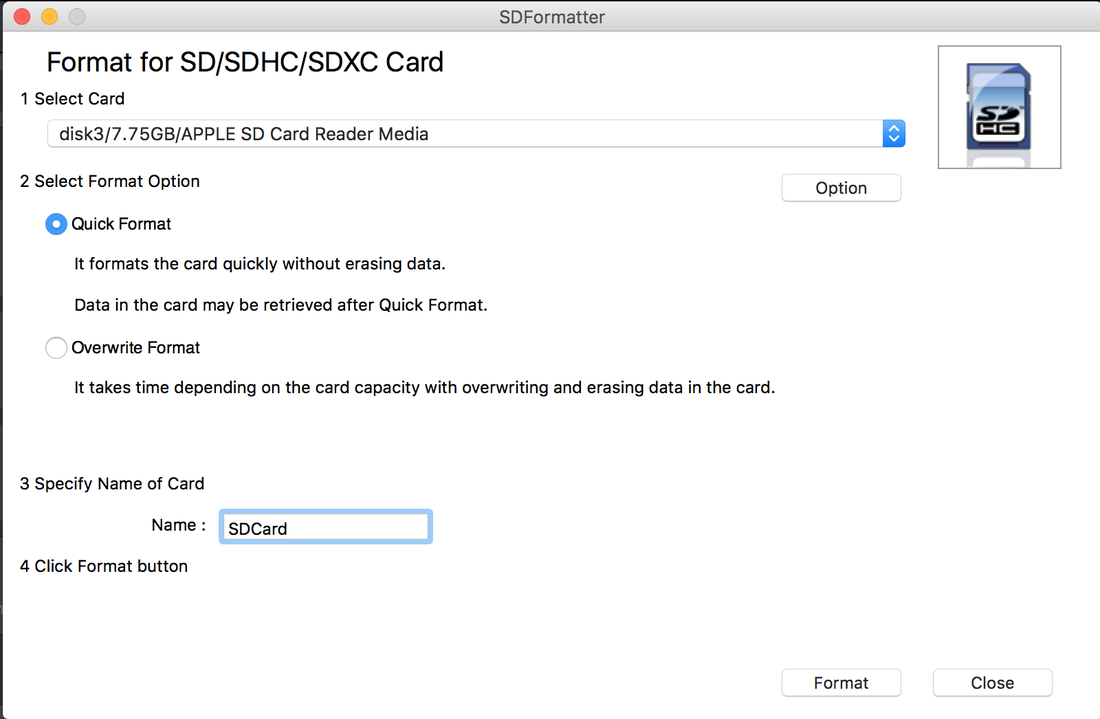 A "Card Format complete" message will appear when the SD Card is ready 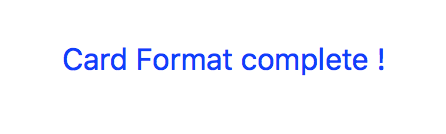 Installing the image (.img) file
note: this may take a VERY long time and the program may occationally look frozen during the application process. If this does happen: be patient and let it run.  When the installation process is complete you'll recieve a completion message like the one below. That's it! You're raspberry PI should now be ready for use! Simply remove the SD Card and plug it into your Raspberry PI and power it up. The PI should boot straight into the OS you chose. 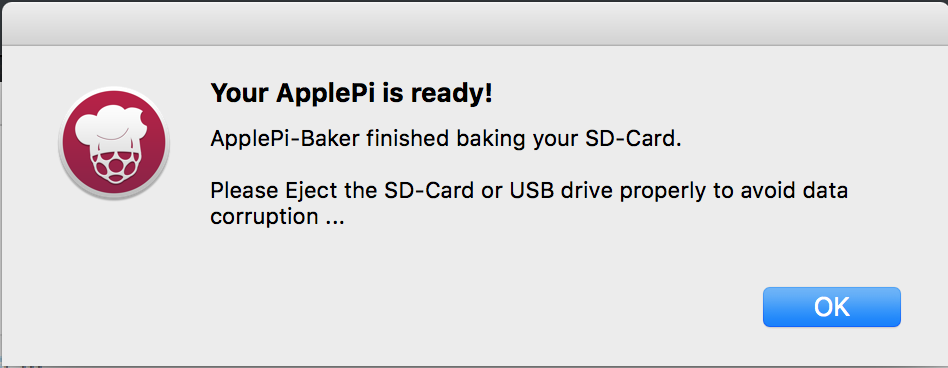 Troubleshoot Most problems are usually tied to either having the wrong image or an incompatible version for your PI. Please check the following before leaving help requests:
Installing Add the ppa to the repository Update the source list Install the theme Code Editor
Install a tweak tool to change theme
UNITY
GNOME
Changing the theme Open your tweak tool (Either by entering name into dash search, or by running it in the terminal) Changing the Theme
Changing the icons
Congratulations! That should be it! You can now enjoy your new Numix theme!  TroubleshootMake sure that you're running the commands as root (sudo) and that the ppa is entered correctly.
If you have any questions or need help, please leave a comment down below!
Preperation: Difficulty: Easy Time: 10-15min Requirements:
Making a bootable USB-Stick First thing we'll need to do is find and download our .ISO or "image" file that contains the system. For convience's sake I've added links to the download mirrors below, but I'd highly recommend checking out Ubuntu's website if you want more information or support the project. Secondly we need a tool to prepare and create our bootable USB stick. In this how-to we'll be using Rufus ISO. (Again, download link below.). Open up Rufus ISO and select the CD-Rom  Navigate to where you saved the ISO, select it and click "Open".  Click "Start" to begin creating the bootable USB Stick. 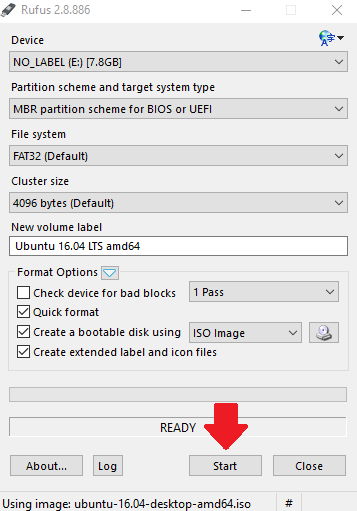 Rufus will ask you which mode you want to write the Image. Use "ISO Image mode" unless you've had problems installing ubuntu in the past.  Rufus WILL wipe all the data on the USB before making it into a bootable USB stick. Backup anything you might have on it before continuing. Press "Ok" to continue. 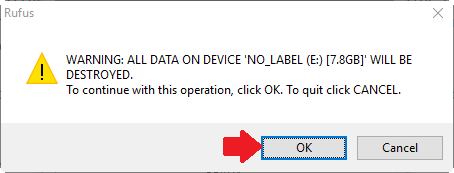 Booting into the system After Rufus has finished preparing the USB stick (Green bar is filled and says "Ready") plug the USB stick into the machine you wish to install Ubuntu and open the boot manager during start. (This is usually done by pressing "F8", "F11" or "Delete" ) Select your device from the boot manager (Usually USB Something) and click enter to boot the USB. Installing the system While it is possible to try and play around with Ubuntu without actually installing the system (Using the bootable USB stick we made) We'll be showcasing how to do a full installation. To ubuntu select the "Try Ubuntu" button, otherwise click "Install Ubuntu" to continue. 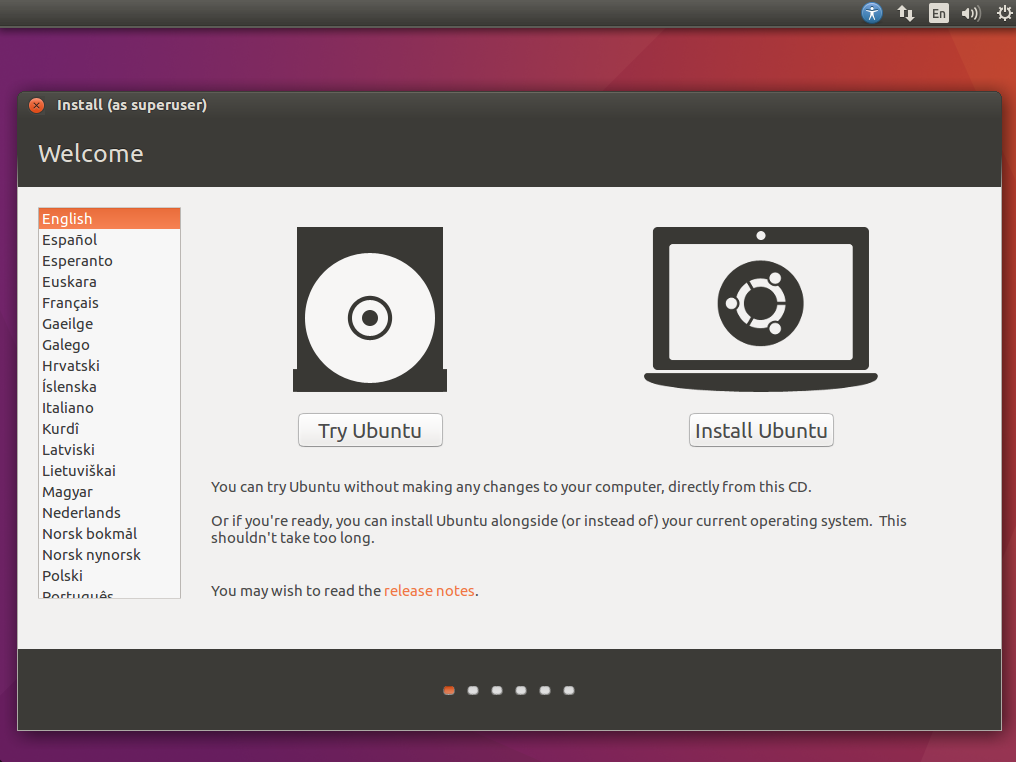 To spare time and to make it easier for new users, select both boxes. This will download all the latest security updates and additional third-party software that will allow you to use Wi-Fi, use Flash, play MP3's and more. Click "Continue" when you're ready to continue. 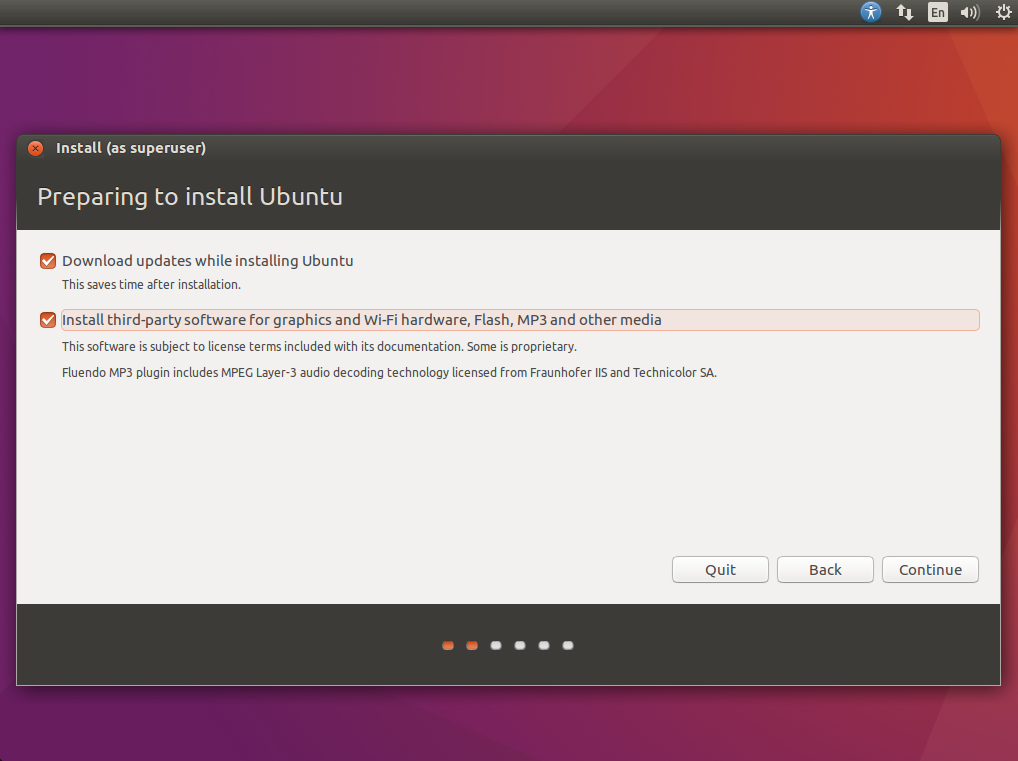 For this How-To we'll do a clean install on a new disk. If you allready have an operating system installed you will have an addtional option of installing Ubuntu alongside it. For the clean install select "Erase disk and Install Ubuntu" and "Install Now" to continue. 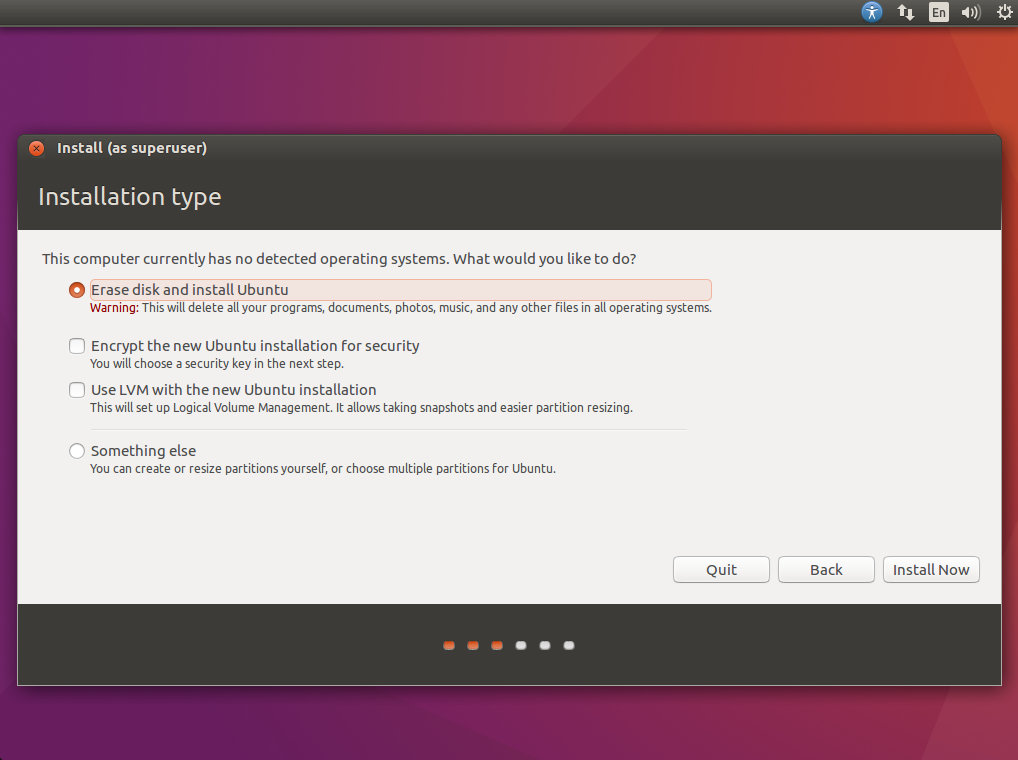 On the confirmation message click "Continue". 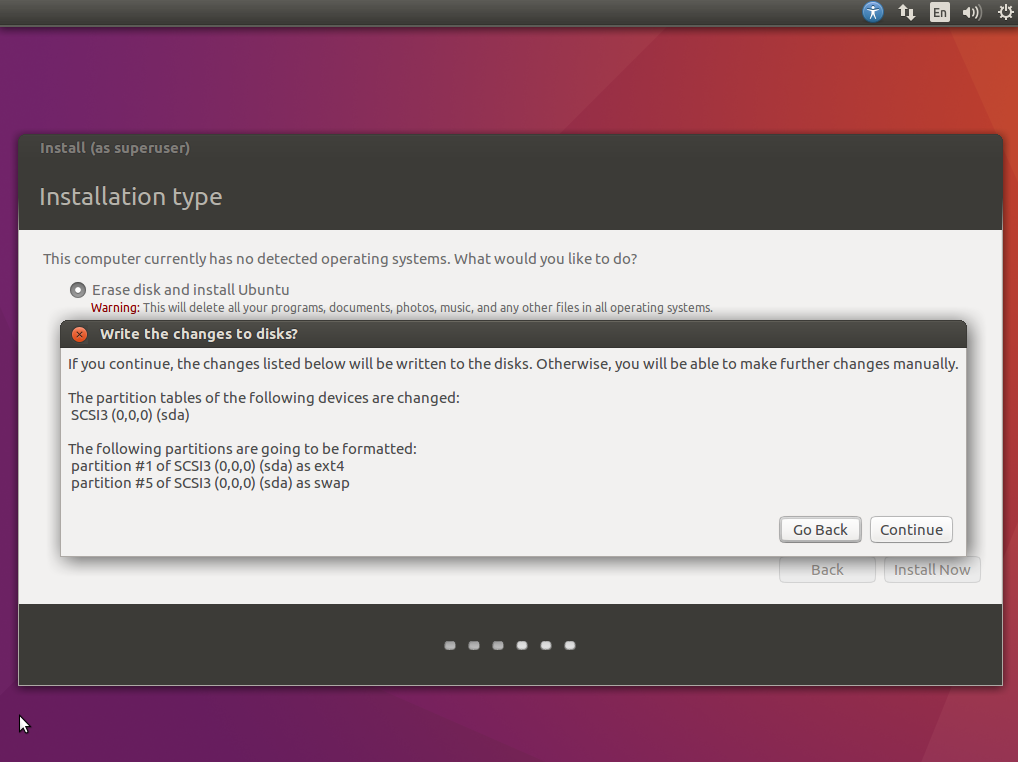 Select your location on the map or enter it through the menu below. This will help Ubuntu set some settings for you. Click "Continue" when you're ready to continue. 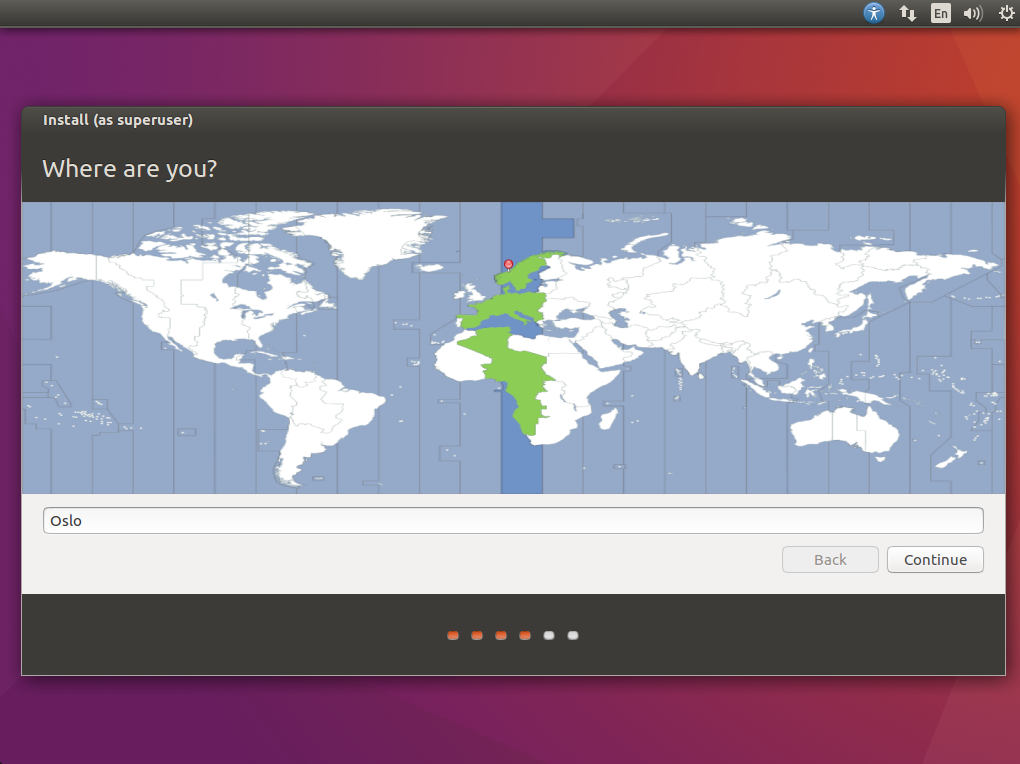 Select your keyboard layout and click "Continue" when you're ready to continue. 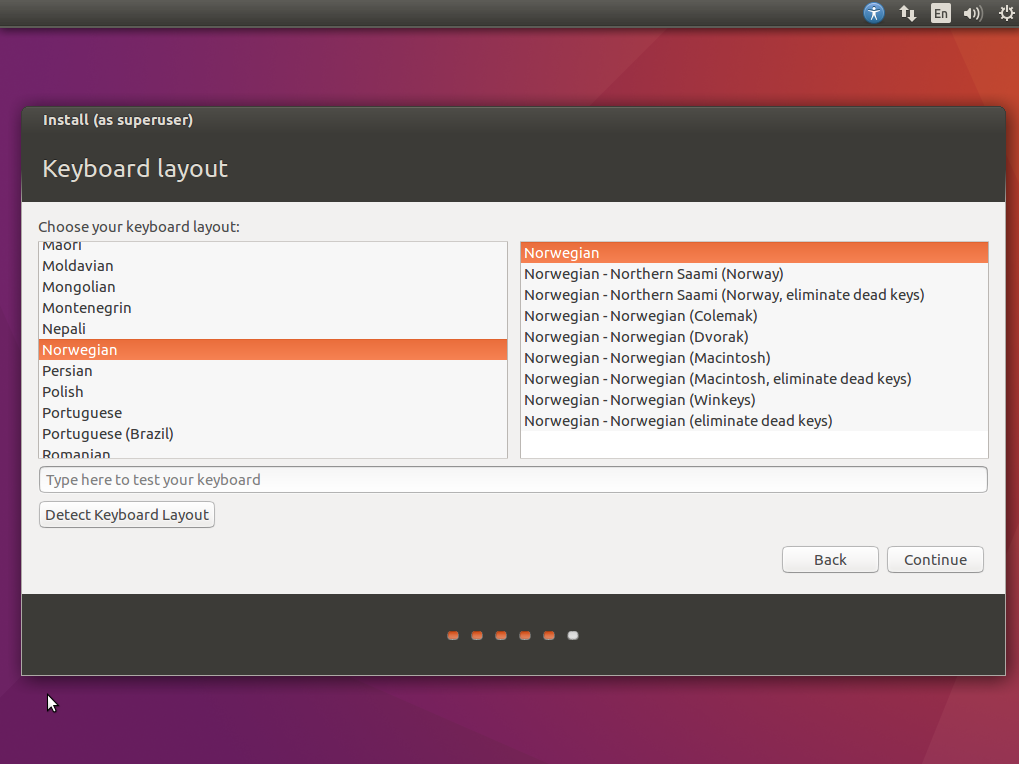 Enter a name, computername, username, and a password for your Ubuntu installation. Click "Continue" when you're ready to continue. 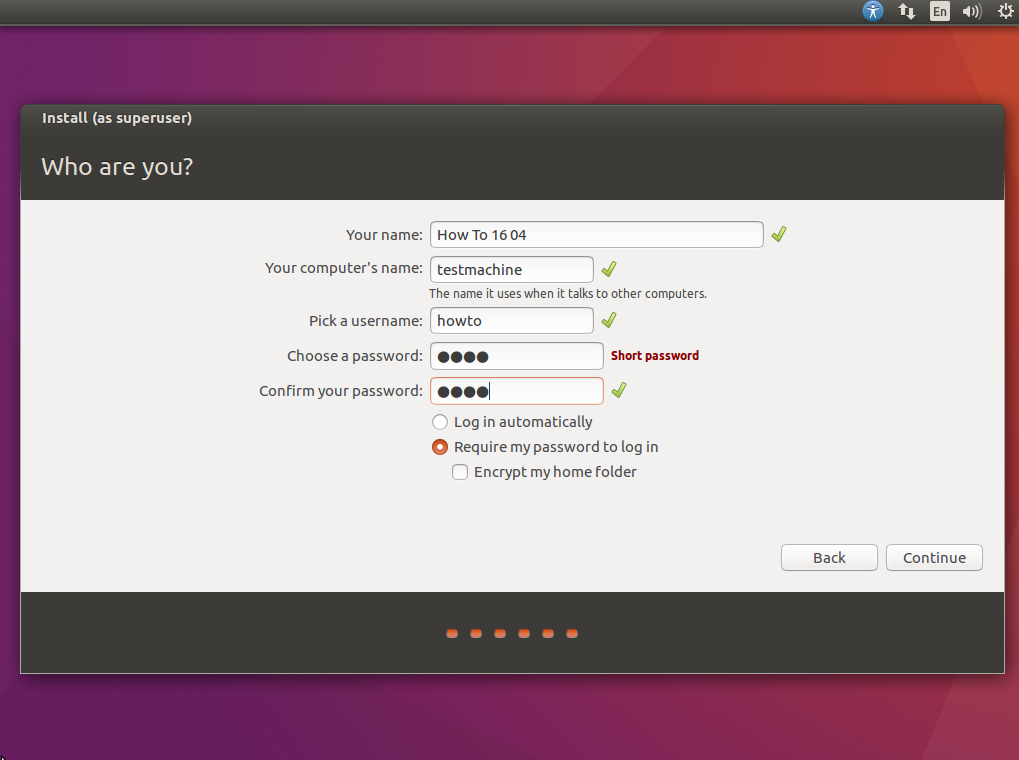 The installer will now finish up the installation progress. This may take some time depending on how quick your computer is. When the installation is complete the following message will be displayed. Click "Restart Now" and remove your USB-stick to boot into your new Ubuntu 16.04 LTS installation. 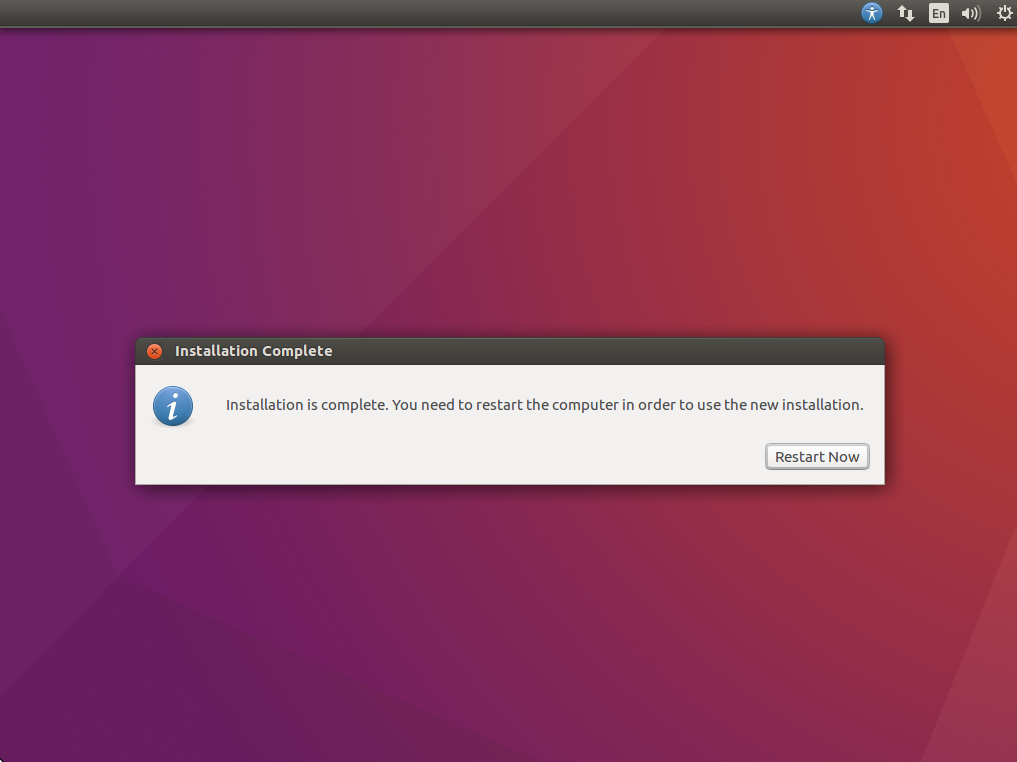 Potential problems & troubleshooting While Ubuntu runs well out-of-the-box in most scenarios you may sometimes encounter problems, bugs and/or missing drivers.
In these cases Ubuntu has a massive community and large amounts of helpful material online which may help your resolve your problem. While a quick google search often results in a quick fix, it might be worthwhile posting on the Ubuntu Forums if your problem persists. If you have any questions, please don't hessistate to leave a comment down below. |

Author
SysAdmin, coder and tech enthusiast. Archives
Categories
|


 RSS Feed
